



Our Blog (55)
We've been behind the camera in Bangalore since 2009 — long enough to know a good photograph is rarely just about the camera. This is where we write about the decisions that shape one before it's ever taken: what to wear, how to price a shoot, why AI still can't replace a real photographer, how to hold a toddler's attention for ten unscripted minutes.
We also write about things that have nothing to do with photography at all — because a studio that reads widely tends to see better than one that doesn't.
Some of this will make you a sharper client, or a sharper photographer. Some of it is just a good read. Either way — settle in.
Sub Topics

Business & Personal Branding (28)
Pricing, positioning, and the decisions that shape how you're seen — on paper and in person.

Behind the Craft (18)
How a photograph actually gets made — technique, gear, and the thinking behind the frame.

Career Guides (5)
Practical, no-nonsense guides for models and photographers building a career.

From the Studio (4)
Off-duty reading — what we're into when we're not behind a camera.
With the spread of COVID-19 and the subsequent lockdowns across the globe virtual meetings and gatherings have become the new norm, resulting in a huge surge in demand for webcams and prices several times the MRP/MSRP. With the lockdown also brought much of our photography business to a standstill, the biggest pinch we felt was the lack of a webcam (i do remember having a decades-old, low-resolution webcam somewhere with the broken mount - hence the "somewhere bit")
We did manage a while with workarounds using 3rd party software and a screen-capture of onscreen live-view video from my cameras(DSLRs)
All this changed by this awesome announcement by Cannon
- Using Canon dSLR as a Webcam
- dSLR as Webcam
- dSLR webcam
- SLR webcam
- Mirrorless as webcam
- Mirrorles camera as webcam
- How to use dSLR with zoom
- dSLR camera with ZOOM
- dslr with Microsoft Teams
- Using dSLR with Microsoft Teams
- dslr for Zoom
- dSLR for Microsoft Teams
- dSLR as camera for ZOOM
- dSLR as webcam for Microsoft Teams
- dSLR as webcam for Google Meet
- use my dSLR as a webcam
- how to convert dSLR into webcam
- connect dSLR to Zoom
- connect dSLR to Microsoft Teams
- connect dSLR to google Meet
- dSLR as webcam on MacOS
- dSLR as webcam in Catalina
- dSLR as Webcam in Mojave
- dSLR as Webcam in High Sierra
- dslr for skype
- ddslr for adobe Character Animator
COVID-19 Update
- With the current lockdown in progress and the uncertainty surrounding it, we are coming up with 1-on-1 online classes & online courses in photography.
- Contact us for more information (Whatsapp:- 9886156696 / eMail:- This email address is being protected from spambots. You need JavaScript enabled to view it.)
- You can also get your questions on photography answered over here.
- We are currently working with limited capacity serving our existing clients. Services are mostly limited to
- Photography services (such as but not limited to) Product Photography.
- We will be following Government Regulations in allowing visits to our studio (single person / short duration) under emergency conditions
- All visitor contact information will be logged for the next couple of months (to allow for tracing if such a need arises)
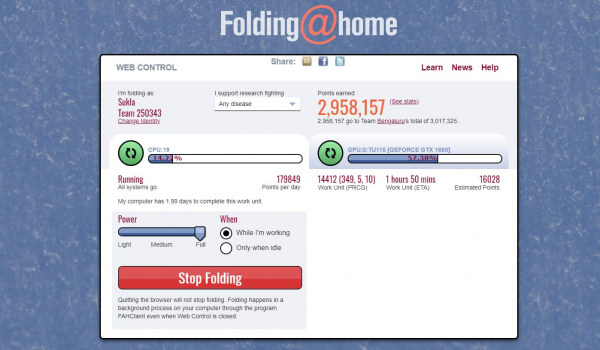
- We are contributing computing time to a distributed computing project Folding@home. (Folding@home is a distributed computing project studying how different proteins work making very large computer simulations)
- To be a part of this initiative and to join Team Bengaluru, visit https://sukla.in/folding@home
- If you have any questions related to Folding@home you can ask them over here.
- The announcement for a Free Modelling portfolio has been deferred until there are restrictions in place for COVID-19 / Corona Virus.
- COVID Virus spreads easily in closed enclosed spaces. This deferment is keeping safety in mind.
- Studio Rentals are now open, please refer to working guidelines here.
For any clarification/support, you can call / Whatsapp us on +91.98861-56696
Organising and executing your own studio session is affordable!
It is one of the best ways to take your photographic skills to the next level.
The primary advantage of shooting in a studio is the ability to control and shape the quality of light. Outdoors, you work with whatever the sun and the weather give you that hour. In a studio, every ray of light exists because you decided it should — its direction, its softness, its intensity, its colour. Photography is, quite literally, drawing with light; a studio is the one place where you hold the entire pencil.
And here's the part that surprises most people: studio lighting is the great equaliser of camera gear. Under controlled studio light, even entry-level and cropped-sensor cameras render sharp, clean, well-detailed images. Why? Because studio flash removes the two things that force cameras to struggle — low light and movement. With ample flash power you shoot at your camera's base ISO (its cleanest setting), and the flash burst itself is so brief that it freezes motion far better than a fast shutter alone. The technical gap between a beginner's camera and a flagship narrows dramatically the moment both are under the same strobes. What remains is the photographer's eye — which is exactly the skill worth building.
All of this control traditionally meant owning a large space and a serious pile of equipment — a hefty price to buy, and a running cost to maintain. Renting removes that barrier entirely: full studio capability, paid for only on the days you actually use it.
Whether that matters to you depends on who you are — so let's take this by skill level, and then talk to the people on the other side of the camera too.
If You're Just Starting Out: The Fastest Classroom in Photography
A single well-planned studio session will teach you more about light than months of shooting outdoors. That's not an exaggeration — it's about how learning works.
Outdoors, the light changes every few minutes: a cloud moves, the sun drops, you change position. You can never be sure whether a photo improved because of what you did or what the sky did. In a studio, everything holds still except the one thing you change. Move the light closer — see exactly what happens. Add a softbox — see exactly what changes. One variable at a time, instant feedback on a tethered screen or camera back. That tight feedback loop is precisely how skills form, and it's why photographers who spend even a handful of sessions in a studio suddenly start "seeing" light everywhere — including outdoors.
The rental model fits beginners perfectly: you get access to lighting worth several lakhs without buying anything, and you find out what kind of equipment you actually like before spending on your own. Think of early studio rentals as trying on gear as much as making photos.
One tip from years of watching first-timers: look for studios run by photographers who also teach. An assistant who can show you why a light is placed where it is turns a rental hour into a masterclass. (It's something we deliberately offer — an assistant is included with our studio rentals to get you productive in the shortest possible time, and there's no faster way to learn than setting up alongside someone who does this daily.)
If You're Building Skills and a Portfolio: Rent to Grow
You've done a few sessions, you know your way around a softbox, and now you want portfolio work — headshots, portraits, small fashion tests, product experiments. This is the stage where studio rental earns its keep in a different way: consistency and repeatability.
A portfolio shot outdoors is hostage to weather and daylight hours. Studio work can be scheduled any day, any time, and — crucially — reproduced. Nail a lighting setup you love? Write it down, and it's yours forever, identical on every future shoot. Clients and agencies notice this consistency in a portfolio; it reads as professionalism long before anyone asks about your gear.
This is also the stage for testing before investing. Thinking of buying strobes? Rent a studio that runs the brand you're eyeing and put it through a real shoot. A few hundred rupees of rental time has saved many photographers from lakhs of buyer's remorse. Studios can also usually source specialised extra equipment from rental vendors at better prices than you'd get walking in yourself — ask.
If You're a Working Professional: Do the Math Before You Sign a Lease
Every working photographer eventually asks: should I get my own studio? Here's the honest arithmetic — the same cost logic we've written about in our pricing guide.
An owned or leased studio is a fixed cost: rent, electricity, maintenance, equipment upkeep — payable every month whether you shoot thirty days or three. Renting converts all of that into a variable cost: it exists only on the days a paying job exists, and it can be billed directly into that job's quote as a clean line item. Until your studio-based bookings are frequent enough that a month of rentals reliably exceeds a month of lease-plus-overheads, renting is not the compromise option — it's the financially correct one.
Renting also solves problems ownership can't:
- Overflow and scale: your own space is too small for that one campaign with a full crew? Rent the bigger space for that job only.
- Location flexibility: a client on the other side of the city becomes bookable when you can rent near them instead of dragging them across Bangalore traffic.
- Zero maintenance drag: modelling lamps age, backdrops tear, flash tubes fail. In a rented studio, that's someone else's capital expense — you always walk into working equipment.
Tips for Renting a Studio Space
While finding a studio is relatively easy, there are a few things to check before making a booking — each of these exists because someone learned it the expensive way:
- Rates: rates vary greatly from studio to studio — but so does the method of counting time and what's included. Double-check how fractions of a day are charged and exactly which equipment comes with the plan. Two studios quoting the same hourly rate can differ by thousands once setup time and gear add-ons are counted.
- Size: studios come in a range of sizes, and this directly drives cost — but bigger genuinely buys you creative room. Distance between subject and backdrop is what lets you control background falloff and avoid spill; a cramped space forces every light to do two jobs badly.
- Hidden charges: beware of extra charges and taxes — the classic being consumables like backdrop paper, billed per metre used or "damaged." A cheap hourly rate with padded consumables can quietly out-cost an honest all-inclusive one.
- Overtime: most studios charge a premium for overtime, and shoots overrun more often than not. Know the overtime rate before you book, plan your session with a buffer, and look out for studios offering gentler pricing on extended hours.
- Equipment hire: standard equipment is usually included, but many studios charge per additional piece — and no studio has everything. You're always expected to bring your own camera and recording media. For anything specialised, ask the studio to source it; they typically get better vendor prices than a walk-in customer.
- Assistant / tutoring: some studios offer an assistant to help you set up — for beginners this is the single most valuable inclusion on the list, worth more than any gear upgrade. It's the difference between spending your first paid hour fumbling with stands and spending it shooting.
Setting Up the Shoot
So let's assume you've found a studio, the rate looks good, and it's free at a convenient time. What's stopping you from booking?
Probably that healthy fear of failure! But with preparation and planning, there's no reason to delay any longer. Here's how to execute your first session with ease:
Talent: the top item on your list is someone to photograph. A professional model contributes real value — but for a first session, it isn't essential, and honestly isn't ideal. Start with someone interesting whom you're comfortable with: a friend, an upcoming artist, another photographer. Here's why this matters: in your first session, your attention will be consumed by lights, settings, and the unfamiliar space. A friend forgives the fumbling; a paid professional's time ticking away adds pressure you don't need yet. Save booking a model for your second session — by then the basics will be muscle memory, and you'll actually be able to direct.
Working with your model: it's easy to forget your model is a real person. Taking time to get to know them before shoot day makes a huge difference — involve them in planning, include their ideas and requests, and they'll arrive invested in the session rather than just present at it. On the day, keep talking, and whatever you do, avoid hiding behind the camera. A silent photographer reads as a dissatisfied one, and the model's confidence — and expressions — drain accordingly. (This is the same principle we use with camera-shy portrait clients: the conversation is part of the craft.)
Lighting: the most time-consuming part of any shoot is the lighting setup, so walk in with a plan. Prepare two or three setups depending on your booked time — the internet is full of diagrams and tutorials. Pick something simple: a single-light setup, a classic headshot, a plain-backdrop portrait. The reasoning is the same one-variable principle from earlier — a simple setup you understand teaches you more (and photographs better) than an elaborate one you're guessing at. Master one light before adding a second; every additional light multiplies complexity, not quality.
Make it a team event: if possible, share the session with a fellow photographer. Costs get split, setup goes faster, one person can adjust lights while the other shoots, and someone keeps the model engaged between setups. There's also a quieter benefit: watching how another photographer approaches the same subject in the same light is one of the fastest ways to discover your own preferences.
And If You're Not a Photographer at All — Why a Studio Portrait Is Worth It
Most of this post speaks to photographers. But there's another reader we meet in our studio every week: someone who simply wants a genuinely good portrait — of themselves, their parents, their family — and is wondering whether a studio session is worth it when everyone has a phone camera at home.
Here's the honest case, from the client's side of the lens:
Controlled light is the most flattering light there is. Studio lighting is shaped deliberately for the person in front of it — softened, angled, and balanced to flatter the actual structure of your face. This is not vanity or heavy editing; it's the same face, simply lit with intention instead of chance. It's the difference you can't quite name when you see a truly professional portrait — and it cannot be replicated by a phone in a living room.
A studio portrait doesn't date. A photo taken against your sofa is stamped with that sofa, that paint colour, that year's clutter. A clean studio portrait — a classic backdrop, timeless light — belongs to no particular year. That's precisely why formal portraits from decades ago still look dignified today, and it's what makes a studio portrait the right candidate for a print that hangs on a wall for twenty years rather than a file that disappears into a phone's camera roll.
The occasion deserves it. A milestone birthday, grandparents while they're in good health, a family complete for a rare few days when everyone's in the same city — these deserve better than a hurried phone photo. A studio session takes an hour or two; the print outlives every device you currently own. Some of the most treasured photographs in any family are formal studio portraits of earlier generations. Someone made time for those. This is your generation's turn.
If that's you, you don't need to know a softbox from a shoebox — that's entirely our job. Come in for a session, and bring the people who matter.
The Short Version
A studio is where light stops being luck. For a beginner, renting one is the fastest classroom in photography. For a growing photographer, it's consistency, portfolio quality, and a way to test gear before buying it. For a professional, it's the financially sensible alternative to a lease — until the bookings genuinely justify one. And for everyone else, it's where portraits are made that still look right on a wall decades later.
The space and equipment are the affordable part. What you build in them — skill or a family heirloom — is up to you.
Camera Shy? Why It Happens — and How to Get Over It
Written by Artriva StudiosIf the thought of being in front of a camera makes you anxious — you're not alone. Not even close. Many of the professionals we photograph — founders, doctors, senior executives, people who address rooms full of strangers without blinking — quietly admit the same thing when they walk into our studio: "I'm really not good at this."
Here's what we've learned after years of hearing that sentence: it's almost never true. What's true is that nobody taught you how to be photographed. It's a skill, like public speaking — and like public speaking, it feels impossible right up until someone shows you how it works.
So this post does two things. First, it explains why cameras make us uncomfortable — because once you understand the mechanics of the feeling, it loses a lot of its power. Second, it gives you practical ways to work through it, each with the reasoning behind it, so you're not just following tips on faith.
And if you're reading this because you have a shoot coming up — with us or with anyone — one thing before we start: you're allowed to say you're nervous. Out loud, to your photographer, at the start of the session. A good photographer doesn't hear that as a problem. We hear it as useful information — it tells us to slow down, explain more, and show you the frames early. More on that at the end.
First — Why Do We Hate Seeing Ourselves on Camera?
This part matters, because most camera shyness isn't really about the camera. It's about the fear of how the result will look. And there's a genuine, well-documented reason your own photos feel "off" to you:
You've spent your whole life looking at yourself in a mirror — which is a flipped version of your face. A camera shows the unflipped version, the one everyone else sees. No face is perfectly symmetrical, so the photo version genuinely looks slightly different from the "you" you're used to. Psychologists call the underlying effect the mere-exposure effect: we prefer what we've seen most often. Your friends and family prefer your photos over your mirror image — because that's the face they've seen most often.
Read that again, because it changes everything: the discomfort you feel looking at your own photos is not evidence that you look bad. It's evidence that you're looking at a slightly unfamiliar version of yourself. Everyone else sees that version every day and thinks it's simply... you.
Once clients understand this, something visibly relaxes in the room. You're not "unphotogenic." You're just the one person on earth least qualified to judge your own photograph.
1. Accept That the Awkwardness Is Normal — Then Start Small
Feeling stiff in front of a lens is the default human response, not a personal failing. A camera is a one-way social interaction: it watches, gives nothing back, and records. Your brain treats that as mild social threat — the same low-grade alert you'd feel if a stranger stared at you silently. Stiffness, a frozen smile, forgetting what to do with your hands — that's just the alert response doing its job in the wrong context.
How to work through it: exposure, in small doses. Record short, throwaway videos of yourself alone — talking about your day, explaining something you know well. Don't review them critically; just let yourself get used to seeing and hearing yourself. The awkwardness fades not because you "get better," but because your brain stops flagging the camera as a threat. Familiarity is the entire mechanism — which is why this can't be rushed, but also can't fail if you keep at it.
2. Practice — But Practice the Right Thing
"Practice makes perfect" is on every list like this. Here's the part usually left out: what you practice matters more than how much.
If you're preparing for a video — a corporate interview, a founder's message, a reel — don't practice reciting. Practice explaining. Explain your point to a friend, to your phone, to an empty chair, in slightly different words each time. Ten relaxed explanations beat fifty rigid recitations, because you're training the skill you'll actually use on camera: thinking and speaking at the same time, in your own voice.
Why it works: every run-through moves a little more of the task from conscious effort to automatic memory. The less of your brain that's occupied with what to say, the more is available for how you come across — and that's the part the camera captures.
3. Write a Script — Then Throw Most of It Away
Writing your thoughts down is genuinely useful: it forces clarity and reveals the weak points in your message. But a fully-written script, memorised word for word, is a trap. The moment you forget one phrase, everything derails — and the fear of that derailment is itself a major source of on-camera anxiety.
The better method: write it all out once, then reduce it to three to five bullet points. Speak from the bullets. You'll say it slightly differently every take, and that's exactly right — small imperfections in phrasing are what make delivery sound human instead of read.
Why it works: a memorised script gives your brain a pass/fail test to anxiously monitor on every sentence. Bullet points remove the test. There's no "wrong word" to trip on when the words were never fixed in the first place.
4. Chase the Idea, Not the Sentence
Unless you're delivering a formal legal or press statement, nobody watching will ever know what you "meant to say." They only know what you said. So the version where you stumbled slightly but stayed warm and engaged will always outperform the version where every word was correct and your eyes were terrified.
Authenticity isn't a soft, feel-good bonus — on camera it's a measurable advantage. Viewers detect the difference between someone reciting and someone talking to them within seconds, and they extend far more trust to the second. Your enthusiasm for your subject, your natural pauses, even your small verbal quirks — these carry your credibility better than polish ever will.
5. Smile — But Understand What the Smile Is Actually For
Yes, a smile makes you look friendly and approachable. But its bigger job happens on the inside: the physical act of smiling — especially a genuine one that reaches the eyes — feeds back into your nervous system and nudges your body toward relaxing. It's hard to hold a real smile and full-body tension at the same time.
The practical trick: don't try to manufacture a smile on command — those photograph as exactly what they are. Instead, just before the camera starts, think of something specific: a memory that makes you laugh, a person who makes you feel at ease, the ridiculous thing your kid said last week. The smile that follows is the real one — and in our sessions, this is precisely why we chat with you between frames. Those in-between moments, right after a genuine laugh, are where the best photographs live.
6. Get Physically Comfortable — It Shows More Than You Think
Discomfort photographs. A collar that's too tight, shoes that pinch, a fabric that makes you feel not-quite-yourself — your body broadcasts all of it through posture and micro-tension, and the camera picks up every bit.
How to get this right:
- Wear something you've worn before and felt good in — a shoot is not the day to debut a new outfit you're unsure about.
- Choose fit over fashion. Well-fitted and simple beats stylish and fidgety, every single time.
- If you're deciding what to wear for a professional shoot, our guide to corporate dressing levels covers what works on camera and why.
Why it works: confidence is partly physical. When nothing about your clothing is demanding attention, your posture opens up on its own — and open, settled posture is half of what people read as "confidence" in a photograph.
7. Be Yourself — Because the Camera Can Tell
If you talk with your hands, talk with your hands. If you think better standing, stand. If your natural expression is calm rather than beaming, a calm portrait of you will be more you — and more effective — than a forced grin.
The goal of a portrait or a video was never to present a perfected stranger. It's to present you, at your most settled and genuine. That version already exists — our job as photographers is simply to create the conditions where it shows up, and to be ready when it does.
What This Looks Like When You Shoot With Us
A few things we do in every session, shaped by years of working with people who told us they were "terrible in front of a camera":
- Tell us you're nervous — genuinely. It changes how we run the session: more conversation, more explanation of what we're doing and why, no surprises. Some of our best portraits are of people who opened with "I hate being photographed."
- The first frames don't count. We treat the first several minutes as warm-up — for you and for us. Nobody's best photo is their first photo, and we plan for that instead of pretending otherwise.
- You see images as we go. Seeing a good frame on the screen mid-session does more for confidence than any amount of verbal reassurance. The moment you see one photo you like, the rest of the session changes.
- We direct — you don't have to know what to do. "I don't know how to pose" is not your problem to solve. Guiding expression, posture, and hands is literally the job. You bring yourself; the direction is on us.
- Your pace, your say. Need a break, a sip of water, a moment to reset? Say so. Uncomfortable with a particular angle or idea? It goes. Nothing about a good session requires you to push through discomfort silently.
The Honest Closing Note
Overcoming camera shyness is a journey, not an overnight switch — and it doesn't require becoming a different, louder version of yourself. It requires exactly two things: understanding why the discomfort exists (mostly the mirror problem, mostly the fear of judgment), and giving yourself enough low-stakes repetitions that the camera stops registering as a threat.
Every attempt — every practice video, every photo session — moves you forward a little. And with time, the camera stops feeling like a spotlight and starts becoming what it actually is: a way to share your ideas, your work, and your personality with people who can't be in the room with you.
And if your next step is a professional shoot — bring the nervousness along. It's welcome here. Handling it well is part of what you're hiring.
What to check before booking a Photo Studio for your next project
Written by Artriva Studios
Chances are that you are a budding photographer, business owner or a marketer trying to get an idea what to expect in a photo studio for your upcoming shoot. Typically a photographer would arrange this for you, but most often they offer you their own studio, even if sometimes their studio might not the right fit for the scope of the project.
Some planning and a well-equipped studio can greatly simplify your logistics and can mitigate most hiccups related to your project. As not all studios are created equal as the available ones vary from makeshift spaces to custom purpose-built spaces & everything in between. Some studios may also be better suited for a particular genre/style of photography than others hence the importance to select the right studio for your needs.
Call for Models for our Photography Workshops
Written by Artriva Studios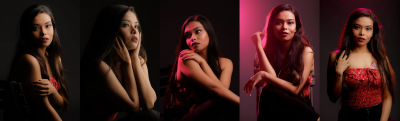
Greetings,
We are happy to now announce that we are now offer workshops on studio lighting. These workshops and tutoring sessions are offered not just offered as group classes, but also as personal workshops. A unique advantage with Artriva's Photography workshops is the amount of time available to the participants for hands on practice and the opportunity to shoot with both Professional & Amaetuer Models to get a good start for their portfolio & getting a hold on .
This combined with small batch sizes ensures that learners do get ample time to learn and test out their creativity. Models on the other hand have the following advantage.
- This will be a Paid assignment for well experienced models.
- New Models get an opportunity to add photos to their portfolio, plus contacts of upcoming photographers.
Do look at some of the photographs shot during one of our previous workshops
How to apply ?
Models need to fill up the following form(s) on our website.
We do have one of the widest range of lighting equipment & light modifiers in Bangalore available exclusively for photographers & cinematographers who rent our studio. We are in the process of continually adding more equipment in our all inclusive rental plans to help simplify the process of organising a shoot and help you control your costs. In the rare event that you need something more you can now reach out to one of our Equipment Rental Partners for a hassle free rentals.
Listed here are some of our preferred Equipment Rental Partners
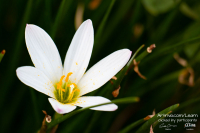
Photographs from our Photography Workshops
We are lucky to be situated among a few old trees that attract a lot of birds which provides a wonderful opportunity for some hands on practice after our workshops. Read on see some of the photographs shot during the practical sessions of our workshops
When to Book Your Maternity & Newborn Photoshoot (Week by Week)
Written by Artriva Studios
Photographing Children, Newborns & expectant moms are a lot different from other genres such as fashion, weddings or general candid photography. We create a warm & enjoyable environment and involve your loved ones in creating a giggle-filled experience to create our signature style portraits of the highest quality. We love capturing genuine intimate emotions of families as a whole.
Photographing children and families can be done in many ways such as relaxed and intimate, lifestyle, bright & colourful involving lots of props, formal or casual studio poses with a soft, classic & gently posed poses. We recommend that you contact us much before your planned shoot date especially when booking for Maternity & Newborn Photography Sessions.
When you hire us you are you are not just hiring us to "snap some pictures". We go the extra mile to understand the requirements and ideas or concepts you have in mind and do everything possible to make your dreams be represented in the pictures we create.
Spirit of Pinkathon - Mysuru2Bengaluru with VI Runners
Written by Sukla Chinnappa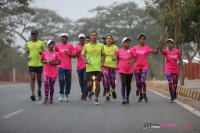
Her Highness, Rajmata Pramoda Devi Wadiyar flagged off the run at the iconic Balarama Jayarama Gateway of the Mysuru Palace. Three days, 145 kms, six sighted guides running with six blind runners onward to Bengaluru. This is a historic run and an inspiring for the running community where visually impaired athletes Mala Kolkar, Renuka Rajput, Sunitha N.D, Kavya N, Nandeesha Janardan and Ajay Eranna along with their guide runners Venkatesh N, Bhadresh S, Bhumika Patel, Nandish Kumar, Rajesh N V and Sachin Tiptur ran the 145 kms Spirit of Pinkathon run from Mysuru to Bengaluru, over 3 days from 23rd to 25th of January 2019. It is also a notable fact that most of the guides too were attempting their first Ultra Marathon
This run celebrates the spirit of health and well-being in the face of all obstacles. The idea was suggested by Head Coach of Samarthanam Trust for the Disabled Bhumika Patel after the VI runners made a record of becoming India’s first visually impaired athletes’ team to complete full marathon at a timed event.
I had the wonderful opportunity to cover the whole event (had earlier had the opportunity to
More...
Professional LinkedIn Photo: A Photographer's Complete Guide
Written by Artriva Studios
A recruiter spends a few seconds on your LinkedIn profile before deciding whether to spend a few minutes. In those seconds, your photo has already answered questions you never got to speak to: Is this person competent? Careful? Someone I'd put in front of a client?
That's not speculation — LinkedIn's own analysis found that profiles with a photo receive over 14 times more views and 36 times more messages than profiles without one. The photo isn't decorating your profile. It's doing a measurable share of the work.
This guide covers what actually makes a profile photo read as "professional" — not a list of ten tips, but the five elements a portrait photographer controls on every headshot, why each one works, and how to get each right whether you're shooting on a phone at home or booking a studio session.
First: What Does "Professional" Actually Mean in a Photo?
Most people assume "professional photo" means "photo of me in formal clothes." It doesn't — you can wear a perfect suit in a terrible photo, and everyone has seen exactly that on LinkedIn.
A professional photo is one where nothing is accidental. The light falls on your face deliberately, not wherever the tubelight happened to be. The background exists on purpose. The crop, the expression, the sharpness — all chosen, not stumbled into. Viewers can't articulate this, but they register it instantly, and they make an unconscious transfer: a person this deliberate about their photo is probably this deliberate about their work.
That transfer is the entire game. It's why a relaxed, beautifully lit photo of someone in a plain shirt reads as more professional than a badly lit photo of someone in a three-piece suit. Intention, not formality, is what the eye reads as "professional."
Everything below is about removing the accidents, one element at a time.
Element 1: Crop & Framing — Designed for a Small Circle
Your LinkedIn photo lives most of its life as a tiny circle — 48 pixels wide next to a comment, a thumbnail in a search result. Whatever you upload must survive that shrinking.
What works: a head-and-shoulders crop with your face filling roughly 60% of the frame (LinkedIn's own recommendation), eyes landing in the upper third, and a little breathing room above your head. Centre yourself — the circular crop is unforgiving to off-centre compositions.
Why it works: human brains are wired to find and read faces, but only when the face is large enough to resolve. A full-length photo shrunk to 48 pixels turns your face into a smudge — recognition fails, and with it, the trust that recognition carries. The head-and-shoulders crop is not a convention; it's the minimum face-size at which the thumbnail still works.
The test: shrink your candidate photo down to roughly the size of your thumbnail on screen and squint. If you can't instantly read the face and expression, the crop is too loose — no other fix will rescue it.
Element 2: Light — The Single Biggest Divider
If one thing separates photos that look professional from photos that don't, it's light. Not the camera — light. A ten-year-old phone in good light beats the newest flagship in bad light, every single time.
What works: soft, directional light hitting your face from slightly above eye level and slightly to one side. At home, the recipe is simple: stand facing a large window (not in direct sunlight), a few feet back from it, with the window doing the lighting and no ceiling light competing.
What fails, and why: overhead tubelights and downlights drop shadows into the eye sockets and under the nose — the "raccoon eyes" look that makes healthy people look exhausted. Direct on-camera flash flattens the face and bounces harshly off skin. Strong backlight (a window behind you) turns you into a silhouette. In every case the problem is the same: the light is shaping your face by accident, and the accidents are unflattering.
Why studio light is different in kind, not just degree: in a studio, light is built for your specific face — its size, its angle, its softness chosen to flatter your particular bone structure, and balanced so both eyes stay bright. That's the difference people sense in a truly professional headshot but can't name. (We wrote more about what deliberate light does — and why it's the thing a phone can't replicate — in our breakdown of Steve Jobs' iconic portrait.)
Element 3: Expression — Approachable Beats Impressive
The expression question everyone asks: smile or serious? The research-backed answer for LinkedIn specifically: a genuine, moderate smile — ideally one that reaches the eyes — consistently reads as more competent and more trustworthy than a stern face. The stern executive look works in an annual report; in a small circle next to a connection request, it reads as cold.
The problem: "smile naturally, on command, alone, at a camera" is close to a contradiction — which is why most people's attempts look pasted on. Forced smiles engage the mouth but not the eyes, and viewers detect the mismatch instantly.
What actually produces a real expression: don't perform the smile — trigger it. Think of something specific and genuinely funny or warm just before the frame; if a friend is taking the photo, have them talk to you and shoot between the posed moments, not during them. In our studio sessions this is precisely why we keep a conversation going — the best frame is almost always the one just after a real laugh, when the expression is settling but still alive.
And if the whole idea of being photographed makes you tense up: that's common, it's fixable, and we wrote a full guide on it — why camera shyness happens and how to work through it. Short version: the discomfort you feel seeing your own photos is a known psychological quirk (you're used to your mirror image), not evidence that you photograph badly.
Element 4: Background — Simple, Solid, and One Correction to Our Own Old Advice
What works: a plain, uncluttered background in a neutral or softly contrasting tone — solid grey, white, a muted dark tone, or a clean wall. The background's only job is to not compete with your face.
Why it works: at thumbnail size, every object behind you steals pixels from your face. A busy background doesn't just look untidy — it literally reduces how much "face" survives the shrink to 48 pixels.
The correction: an earlier version of this article recommended gradient-lit backdrops as the premium choice. In print and on large screens, they are. But we've since tested and documented what LinkedIn's compression does to gradients — it shreds smooth tonal transitions into blocky banding, and the more beautiful the gradient, the worse the damage. For LinkedIn specifically, solid beats gradient, and we now shoot LinkedIn-destined headshots accordingly. The full technical explanation — and how to export your file so LinkedIn's compression has nothing left to destroy — is in our companion piece: Why LinkedIn Is Quietly Ruining Your Profile Photo & How to Fix It.
Element 5: Wardrobe & Grooming — Match the Room You Want to Be In
The principle: dress for the role you're presenting, at the level of formality your industry actually operates in. A corporate lawyer's photo and a game designer's photo should not follow the same dress code — and both would look wrong in the other's.
What works on camera specifically: solid colours over busy patterns (fine stripes and small checks can shimmer oddly on screens), a tone that contrasts gently with your background so you don't merge into it, and simple accessories. Well-fitted beats fashionable; anything you'd fidget with, leave off.
Why simple wins: the same pixel-budget logic as backgrounds — at thumbnail size, a loud pattern becomes noise, and noise near your face costs recognition. Every element that isn't your face should be quiet.
For a complete breakdown of formality levels — from boardroom to startup, with Indian and Western options and the reasoning behind each — see our guide to corporate dressing levels.
Phone, Studio, or AI? An Honest Comparison
Because we're a headshot studio, you'd expect us to say "book a studio." Here's the honest version instead.
A phone photo can absolutely be good enough — if you control the accidents. The checklist: window light from the front, rear camera (not the selfie camera, which distorts facial proportions at arm's length and produces a lower-quality file), someone else holding the phone from about 1.5–2 metres away, a plain background, several dozen frames to choose from, and the thumbnail squint-test on the winner. Do all of that, and your photo will beat most of LinkedIn.
A studio session buys you the things a checklist can't: light designed for your specific face, a photographer directing your expression so you don't have to perform it alone, professional retouching that stays restrained, and — increasingly relevant — a set of images consistent enough to use across LinkedIn, your company site, speaker bios, and press. If your photo is doing commercial work (fundraising, sales, senior roles), the session pays for itself in the first impression it wins.
AI-generated headshots deserve a straight answer, since they're everywhere now: they've become impressively plausible, and impressively risky in the one dimension that matters. A profile photo's core job is recognition — the moment someone meets you and you don't quite match your photo, a small trust debt is created before the conversation starts. AI generators routinely smooth, reshape, and idealise past that recognition threshold. Use them if you must, but audit the result against a mirror, not against your hopes. (Our longer view on this: why AI can't replace the human touch in headshots.)
The Technical Checklist
- Dimensions: LinkedIn accepts from 400×400 px up to 7680×4320 px, max 8 MB. Displayed sizes run from 48×48 (notifications) to 400×400 (profile).
- Recency: within the last 2–3 years, or sooner after a major change (glasses, hairstyle, beard). The photo's job is recognition — an outdated photo fails it in person, at the worst possible moment.
- Solo: just you. Cropped-out shoulders and mystery hands from group photos are instantly recognisable and quietly unprofessional.
- Face uncovered: no sunglasses, no cap shadowing the eyes. Eye contact is where photo-trust lives.
- Export & upload correctly: the final step most people never learn — sizing and compressing the file so LinkedIn's algorithm doesn't degrade it on arrival. Full workflow in our upload optimisation guide.
The Five Most Common Mistakes (Ranked by How Fast They Undermine You)
- The decade-old photo. Flattering, and a liability — every in-person meeting starts with the other person recalibrating.
- The cropped group shot. The stray shoulder announces "I didn't think this was worth ten minutes."
- The arm's-length selfie. Front-camera distortion widens the nose and forehead, and everyone recognises the pose.
- The heavy filter / over-retouch. Smoothed-to-plastic skin reads as insecurity, and modern viewers spot it in half a second.
- The accidental everything. Random light, cluttered room, wrinkled shirt — no single disaster, just the cumulative signal that nothing here was chosen. Which, as we covered at the top, is the exact opposite of what "professional" means.
The Short Version
A professional LinkedIn photo isn't about the suit — it's about intention. Face large enough to survive the thumbnail. Light that shapes you on purpose. An expression that was triggered, not performed. A background that stays out of the way. Clothes that match the room you want to be in. Get those five right on a phone by a window, and you're ahead of most of the platform. Get them right in a studio, and the photo starts opening doors on its own.
And if you'd rather have all five handled for you — including the correctly compressed, LinkedIn-ready export as you walk out — that's exactly what our corporate headshot sessions are built to do.
Your profile photo is working every hour of every day, in every search result and connection request. Ten seconds of viewing, thousands of times a year. Make those seconds count.
- This is a weekend workshop conducted over two days covering technical, artistic and post-processing aspects of photography
- Open for everyone i.e. beginners, amateurs and even advanced amateurs
- No pre-requisites except for having a camera in hand to better understand the concepts
The Photography Workshop is designed for photographers of all levels. The workshop is intensive in nature and caters to those who seek more information, and includes an open discussions.
This two day course in Bangalore is for everybody looking for a introduction to the fascinating world of photography. Join professional photographer Sukla Chinnappa & Avinash Chinchalkar as they share secrets and insights into how to make photographs that captivate and amaze. Get real-world advice to help make the most of your camera. This is a class which will fundamentally change the way you see. This is a class about getting inspired, learning new things, working through burnout, and getting back to the part of photography that was fun and attracted you in the first place: looking and seeing.

The foremost important thing a model must know is how to build a modelling portfolio. Having a good modelling portfolio is the first step on the path to being a model, and it helps in acquiring an agency representation as well. There are many ways to build your portfolio, however, the way you choose to go about it, you must bear in mind that your modelling portfolio is a vital accessory which can make or break modelling opportunities.
REMEMBER: Your portfolio is your first impression, and your best chance to book modelling work.
So how does one go about building a modelling portfolio?
How to improve responses on your Online Portfolio
Written by Artriva StudiosIn this fast paced world rew relationships are being constantly made online be it for serious long term commitments through Matrimony Sites, Business / Professional relationships through LinkedIN. Even the new age Tinder is also throwing up some long term relationships. Hence it is very important to have a good impeccable professional photographs for each site based on the kind of response you are looking for.